Vase mode printing is a specialized type of printing in which the print head moves upward gradually along the Z-axis as it simultaneously moves in the XY plane. Standard printing extrudes material while moving only in the XY plane and makes discrete non-extrusion moves in the Z to reposition the extruder or transition between layers. Vase Mode printing generally lends itself to the production non-functional, aesthetically pleasing parts. Generally, it achieves faster print times and better surface finishes than traditional printing.
Advantages vs. Restrictions
Advantages:
No “seam” along the sidewall of the part, as “seams” are caused by the discrete Z moves between layers.
Faster than non-vase mode, even with comparable print settings.
No “stringing” on the part as there are no non-extrusion travel moves.
Restrictions:
Prints only the outermost shell of the part - no infill, support, or solid top and bottom layers.
Ignores holes and voids in the part
Limited expansion and contraction of the part between layers. If a slice is much larger or smaller than the previous layer, this will produce holes in the wall of the print.
Each “layer” must be contiguous. Each layer can only contain one closed loop polygon.
Generating Toolpathing
The core of vase mode printing is to project the XY plane slice path in the Z axis. The stl file is still divided into slices, using the outer most contour of the part to generate the path for each slice. Then, the points in that slice must be shifted upward along the Z axis a percentage of the layer height equal to the percentage of the total distance of the layer that has been traversed thus far.
Figure 1: Determining vertical position (Z height) of each contour point.
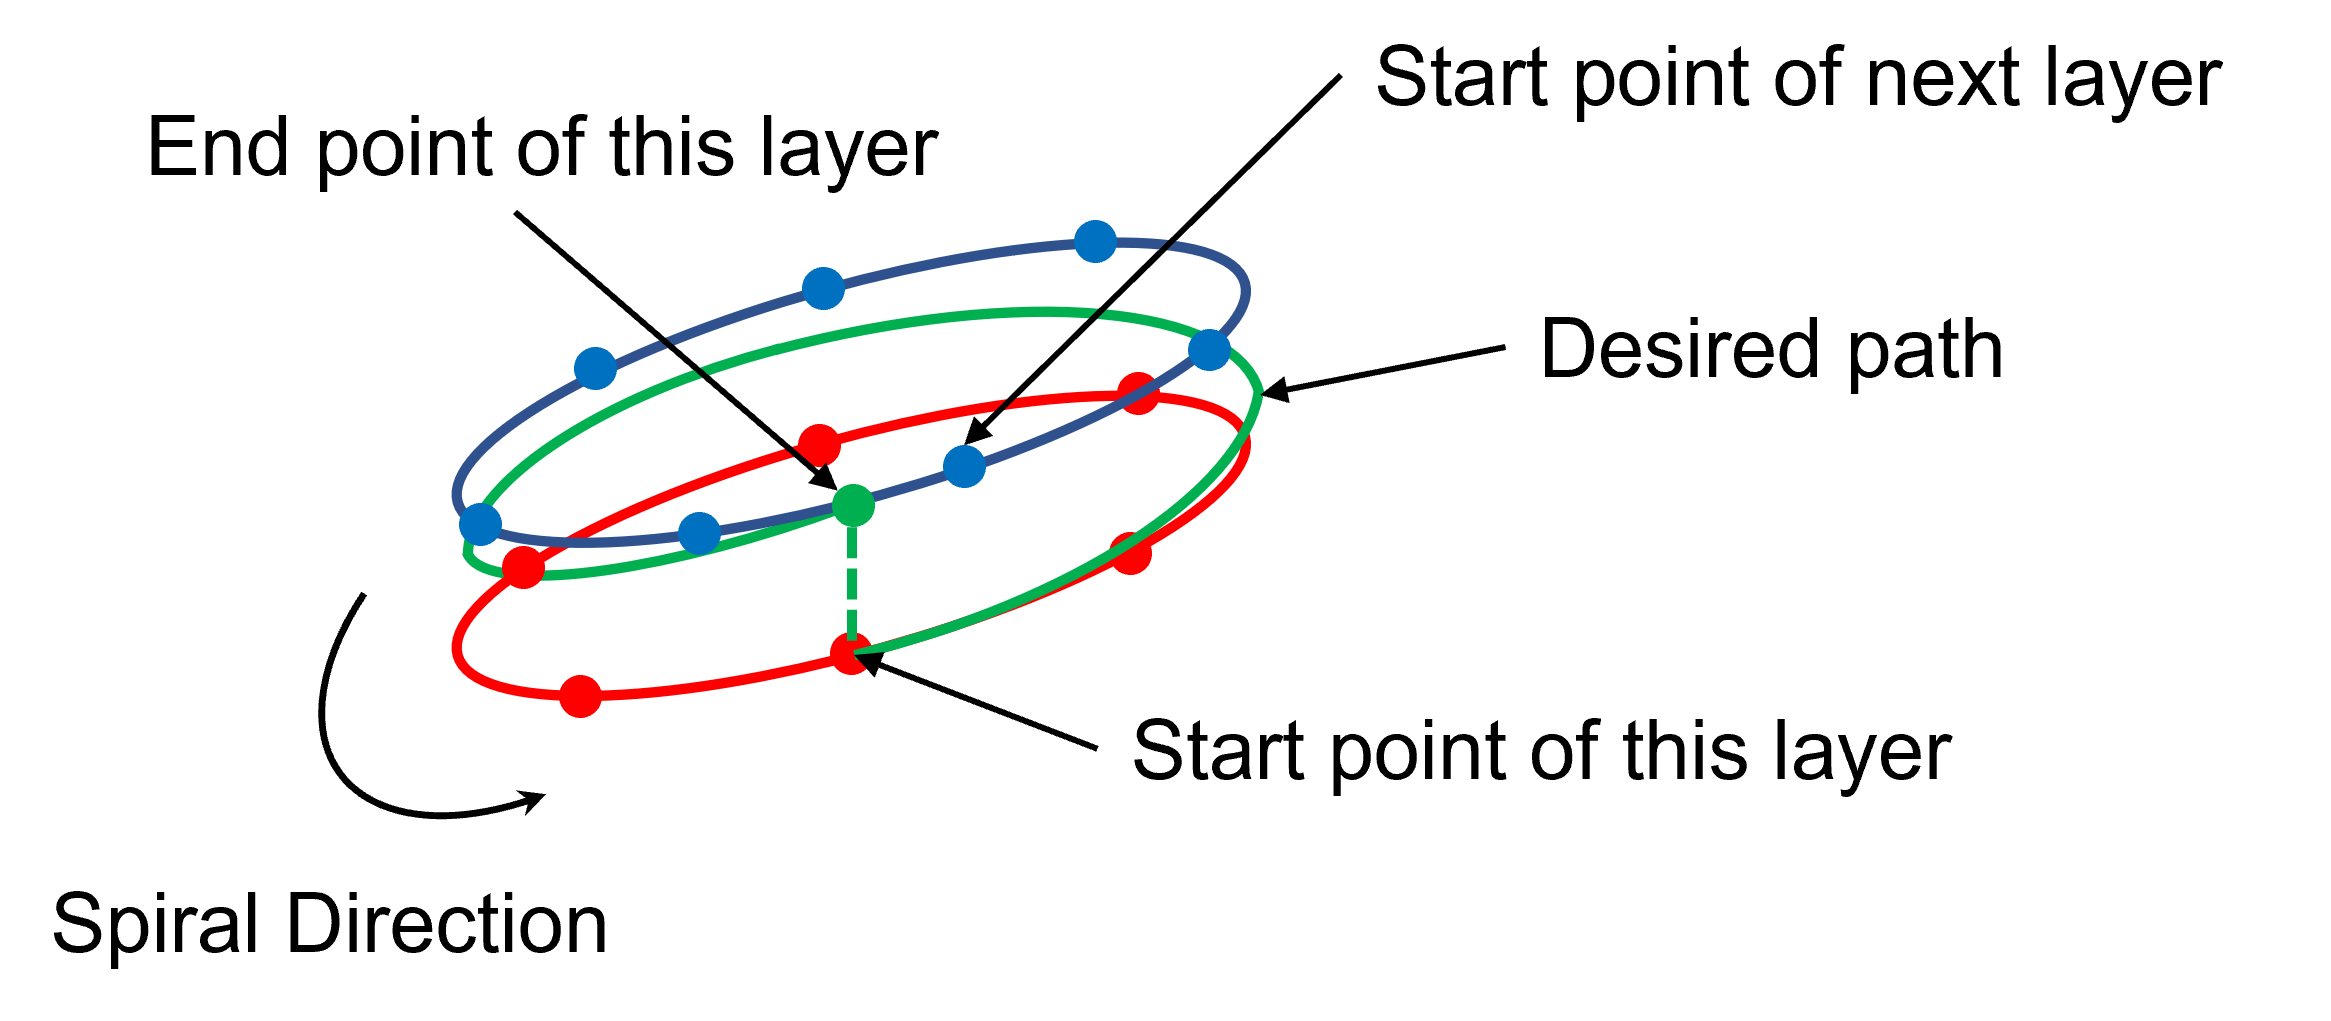
Figure 2: Conceptual illustration of the vase mode path
Figure 2 illustrates the basis of the vase mode path. The current layer points (red) are mapped to the spiral path. The contour points of the next layer are shown in blue. Note that the end point for the current layer path (green) almost never aligns with a contour point in the next layer. This leads to two challenges for continuing the vase mode path across layers. The first is finding the starting point in the next layer. The second is finding the Z axis height of the starting point in the next layer.
While this may, at first, appear trivial, the creation of contour points for each layer causes complications. The points defining each contour are stored in an ordered list for each layer, but there is no correlation of the XY starting location for the beginning of each contour across layers. This means the starting points for two adjacent layers could be on opposite sides of the part. Again, this may appear trivial when visualized like in Figure 3, but becomes more challenging when working with the acutal data, as visualized in Figure 4.
Figure 3: Contour points with visualized path
Figure 4: Contour point data.
The second challenge is determining the Z-axis height of each contour point when the X, Y coordinates of the current layer spiral path starting point do not correspond to the X, Y coordinates of a contour point in the previous layer. The slicer must appoximate the X, Y postion of the spiral at the layer boundary. It used this location to get an accurate length from this point to the subsequent point in the new layer. An inaccurate value for this distance will shift all the points in the new layer away from their proper vertical positions. Further, this error will compound through subsequent layers and impact the quality of the print.
Print Applications
Vase mode printing works well for certain types of parts and geometries - pipes, tubes, vases, boxes, and similar shapes are typically good candidates, as well as those for which aesthetics but not strength is important. Since vase mode prints are single shell only, they can only handle very minor loads and stresses.


